Assalamualaikum wr.wb.
Hello Sharelikers,today I will share tutorial how to make our footer template be Four column .we have two option,It can be add or change your footer.That you know,in the last I had written about how to add the footer element to your blog.thats meaning your footer column only one.And also two column Footer. Now and the last Triple Column Footer I want to share tutor how it can change to be Quadrupel or Four column or add Four column on the above of your recents footer.
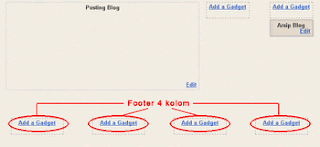
1.I think this tutor isnot new in the tutorial Blog.But yah what ever,just like my blog say,Yang Penting share :D.This below screen shot when your done the steps from this tutorial well
Ok, lets go we start how to make it real:
2. Or If you wanna add the column above your footer be Four column (please Note:your blog have footer wrapper before),you must follow this steps :1.I think this tutor isnot new in the tutorial Blog.But yah what ever,just like my blog say,Yang Penting share :D.This below screen shot when your done the steps from this tutorial well
Ok, lets go we start how to make it real:
- Log in to your acount in blogger
- then click Design on dashboard
- then click Edit Html
- next click Expand widget Templates
- then Search this code in your template ]]></b:skin>
- Then put this code above ]]></b:skin>
#footer-column-divide
clear:both;
}
.footer-column {
padding: 10px;
} - then search the code that similar with this code (maybe in each templates is differents)
<div id='footer'>
<b:section class='footer' id='footer' showaddelement='yes'/>
</div>or<div id='footer-wrapper'>
<b:section class='footer' id='footer' showaddelement='yes'/>
</div> - then change <b:section class='footer' id='footer' showaddelement='yes'/> with this below code :
<div id='footer-column-divide'>
<div id='footer1' style='width: 25%; float:left;
margin:0; text-align:left;'>
<b:section class='footer-column' id='col1'
preferred='yes' style='float:left;'/>
</div>
<div id='footer2' style='width: 25%; float: left;
margin:0; text-align: left;'>
<b:section class='footer-column' id='col2'
preferred='yes' style='float:left;'/>
</div>
<div id='footer3' style='width: 25%; float: right;
margin:0; text-align: left;'>
<b:section class='footer-column' id='col3'
preferred='yes' style='float:right;'/>
</div>
<div id='footer4' style='width: 25%; float: right;
margin:0; text-align: left;'>
<b:section class='footer-column' id='col4'
preferred='yes' style='float:right;'/>
</div>
<div style='clear:both;'/>
</div>
- then save your template.
- next you can add gadget in your new column
- In Edit html (design tab) you search the similar code like this :
#footer(-wrapper*) {/--note *several templates using only footer or Footer-wrapper name--/
width:900px;
clear:both;
margin:0 auto;padding-top:15px;
line-height: 1.6em;
text-transform:uppercase;
letter-spacing:.1em;
text-align: center;
} - then put this below CSS after it :
/* bottom
----------------------------------------------- */
#bottom {
width:900px;
clear:both;
margin:0 auto;
float:left;
padding:10px 0;
color:#333;
background:#ffffff;
border-top:1px solid #333;
}
#bottom a:link {
color:#006699;
text-decoration:none;
}
#bottom a:hover {
color:#c06000;
text-decoration:underline;
}
#bottom a:visited {
color:#045FB4;
text-decoration:none;
}
#bottom h2 {
padding:20px 0 2px 0;
margin:0 0 10px 0;
border-bottom:1px dotted #cccccc;
font-size:11px;
font-weight:bold;
line-height:1.4em;
text-transform:uppercase;
}
#bottom ul {
padding:0;
margin:0;
color:#333;
}
#bottom ul li {
list-style-type:none;
border-bottom:1px dotted #333;
background:url("http://i35.tinypic.com/2n03mgz.jpg") no-repeat 0px .17em;
padding-left:17px;margin-top:2px;
}
#left-bottom {
width:220px;
float:left;
padding-left:15px;
}
#center-bottom1 {
width:220px;
float:left;
padding:0 10px 0 10px;
}
#center-bottom2 {
width:220px;
float:right;
padding-right:0 10px 0 10px;
} >
#right-bottom {
width:220px;
float:right;
padding-right:15px;
}
- Then search the similar code like this :
<div id='footer'>
<b:section class='footer' id='footer' showaddelement='yes'/>
</div> - Put this below code above it
<div id='bottom'>
SO The code be like this :
<b:section class='bottom' id='left-bottom' preferred='yes'/>
<b:section class='bottom' id='center-bottom1' preferred='yes'/>
<b:section class='bottom' id='center-bottom2' preferred='yes'/> <b:section class='bottom' id='right-bottom' preferred='yes'/>
</div> <!-- end bottom -->
<div id='bottom'>
<b:section class='bottom' id='left-bottom' preferred='yes'/>
b:section class='bottom' id='center-bottom' preferred='yes'/>
<b:section class='bottom' id='center-bottom2' preferred='yes'/>
<b:section class='bottom' id='right-bottom' preferred='yes'/>
</div> <!-- end bottom -->
<div id='footer'>
<b:section class='footer' id='footer' showaddelement='yes'/>
</div>
- Then Save your Template.Know you may add new Widget like Top commentator, recent comments,or recent post or else in your new footer column.You can change the style,color or font with your Template style.
source :
- http://www.hermanblog.com/2009/03/cara-membuat-footer-multi-kolom.html
- http://www.gentayangantriks.co.cc/2011/02/menambah-kolom-elemen-di-atas-footer.html
Tampilan terbaik menggunakan Google chrome dan Mozilla +5 layar 1280x854


pertamax diamankan..
ReplyDeleteizin menyimak dulu :)
itu kalo rencananya mau buat yang sama besar..kalo mau sesuai keinginan tapi dari template bawaan pihak ketiga, gimana?misalnya mau yang kiri sekian lebarnya, tengah sekian, dst..[kode 'angka mana yang perlu diperhatikan buat dibagi..]lebih lengkap dan kalo perlu lebih 'njelimet' lagi pembahasannya om, biar beda sama blog yang lain yang udah ngebahas beginian.. Salam :D
ReplyDelete@Rahman Adiyasa Oke silahkan nyimak :D
ReplyDelete@Dokter GigiOh itu ya dok,begini dok yang perlu kita perhatikan adalah ukuran width dari header template (terutama outer wrapper) kita,jika header template kita 900 px maka bila kita mau bagi jadi 4 bagian maka 900 dibagi 4,dengan catatan menyisakan sedikit untuk margin sehingga bisa menggunakan width ="25 %" atau bisa dengan px yaitu width="220px" .Dan juga yang perlu diperhatikan adalah margin dan paddingnya ,bila kita membuatnya 4 ,maka dua yg ditengah harus punya ID berbeda ,misal center1 dan center2 (liat di kode diatas).untuk paddingnya tentu kita asumsikan bahwa yg ditengah diapit oleh dua kolom footer (kanan dan kiri) sehingga kita atur sedemikian rupa agar rtapi misal dengan padding="10pX",kita bisa bereksperimen sesuai ukuran template kita dan sebelum disave,ditinjau dulu agar ps dihati .Maaf bila masih kurang tlong ditanyain lagi
ReplyDeleteperlu di coba
ReplyDeleteNice share, YPS emang T.O.P B.G.T.. :)
ReplyDeleteGue tunggu tutorial blog lainnya yang lebih greeess.. he
@Bensap silahkan dicoba :D
ReplyDelete@Feby Oktarista Andriawan thanks bro,walau tutornya newbie hehe
ReplyDeletedah tak terapkan di blog q juga sob, mantab dah
ReplyDeleteblog q juga dah tak asang sob, g ada demonya nih, siapa tahu nanti aq pengen rubah tampilan
ReplyDelete@Rizkyzoneya bang rizki ,saya pake tuh di hOme cuma tiga kolom ajah dah kebanyakan widget
ReplyDeleteWah ini yang saya cari, punya saya 3 aja dan ingin buat 4 karena masih banyak yg kosong widgetnya. Yang bhs Indo ada gak mas? ga ngerti bahasa Inggris.
ReplyDelete@DAW-XP wkwkw gak ada sob,terjemahin aja :D sebenarnya sma aja caranya dengan 3 kolom tinggal nambahin satu div id aja sama pengaturan widthnya disesuain
ReplyDeleteane datang lagi gan, untuk membuat rusuh blog agan *kidding :D
ReplyDeletevisit back ya gan :D muachhh :*
akakwakwakwkawka
hahaaha galauers datng oke dechhh
Delete